Contents
- Support Guests
- Network Access for Guests
- Your Role as Sponsor
- Sponsor Portal
- Sign on to the Sponsor Portal
- Unable to Sign On Because Account is Locked
- Create Guest Accounts
- Sponsor Portal Create Accounts Page
- Create a Known Guest Account
- Create Random Guest Accounts
- Import Guest Accounts
- Privacy of Guest Passwords
- Create Account Settings
- Manage Guest Accounts
- Sponsor Portal Manage Accounts Page
- Edit Guest Accounts
- Resend Guest Passwords
- Extend Guest Account Durations
- Suspended and Expired Guest Accounts
- Suspend Guest Accounts
- Delete Guest Accounts
- Reset Guest Passwords
- Reinstate Guest Accounts
- Manage Accounts Page Details
- Manage Account States
- Pending Guest Accounts
- Sponsor Portal Pending Accounts Page
- Approve Pending Accounts
- Deny Pending Accounts
- Pending Accounts Page Details
- Pending Accounts States
- Notices and Notifications
- Notices When Creating Random and Imported Guest Accounts
- Provide Account Details to Known Guests
- View and Provide Random Guest Account Details
- View and Provide Imported Guest Account Details
Support Guests
- Network Access for Guests
- Your Role as Sponsor
- Sponsor Portal
- Sign on to the Sponsor Portal
- Unable to Sign On Because Account is Locked
Network Access for Guests
With the increased use of and dependency on mobile devices, such as laptops, tablets, and mobile phones, people have become accustomed to being able to access the Internet from anywhere. However, access to corporate networks requires more security than free Wi-Fi at a local coffee shop. Network security is critical to maintaining your company’s confidentiality and data integrity. Unauthorized users could negatively impact your company’s network directly by causing it to fail or indirectly by using it to cause harm to others.
To protect your company’s network and to ensure that only authorized guests can access it, your company uses Cisco Identity Service Engine (ISE) guest services. Cisco ISE ensures that only authorized guests, such as visitors, contractors, consultants, and customers can access your network.
When people outside your company attempt to use your company’s network to access the Internet, they are automatically routed to a Guest portal, which is a set of special web pages that provides Cisco ISE guest services to your visitors. These Guest portals protect your network from unauthorized users. Temporary visitors, who connect to your company’s Wi-Fi network, can be directed to a Hotspot Guest portal which provides network access without requiring them to log in using usernames and passwords. However, if authorized visitors need access for an extended period of time or need greater access to your company's internal resources, as a sponsor, you can create temporary usernames and passwords that guests can use to log into the credentialed Guest portals.
Your Role as Sponsor
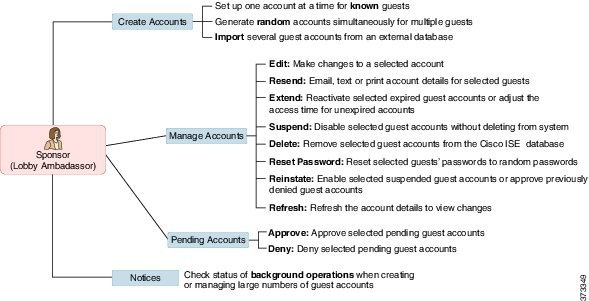
As a sponsor, you are responsible for using the Sponsor portal provided by Cisco ISE to create and manage guest accounts for authorized visitors to your organization. These accounts enable visitors to access your company’s network or provide access to the Internet. When creating these accounts, you should adhere to your company guidelines for providing network access to visitors. Cisco ISE records and stores the entire process for auditing and reporting purposes, which your company can use to verify that only authorized visitors have been granted network access.
Sponsor Portal
Your system administrator assigns functionality to your sponsor account based on the sponsor group to which you are assigned. As such, you might not have access to all the features available on the Sponsor portal.
Sign on to the Sponsor Portal
The Sponsor portal is a web-based portal that you use to create guest accounts for authorized visitors. Once you are signed into the Sponsor portal, you will be automatically logged out after a period of inactivity, which is configured by your system administrator.
If you log in successfully on your desktop, the Create Accounts page, which is the home page for the Sponsor portal displays. If signing on from your mobile device, a welcome page displays. If not, contact your system administrator for assistance.
Unable to Sign On Because Account is Locked
By default, if you incorrectly enter your password for your sponsor account five times in a row, the Sponsor portal temporarily locks you out of the system for two minutes. You can make additional attempts after that, but only one attempt at a time is possible before you are locked out again for the configured amount of time. Your system administrator can change this default setting to require fewer or more failed attempts before temporarily locking your account; as well as the amount of time you are locked out.
Create Guest
Accounts
- Sponsor Portal Create Accounts Page
- Create a Known Guest Account
- Create Random Guest Accounts
- Import Guest Accounts
- Privacy of Guest Passwords
- Create Account Settings
Sponsor Portal Create Accounts Page
You can use the Create Accounts page to create accounts for the following authorized visitors:
-
Guests whose personal information, such as last name, email address, or phone number, is available to you.
-
Guests whose personal information is not available or when you need to create multiple accounts quickly.
-
Guests whose information is available in an external database in the form of a file that you can import.
Create a Known Guest Account
You can create individual accounts for guests whose personal information is available, one account at a time.
What to Do Next
You can email or print the account details for guests, if these facilities are available to you. You can also text the account details to guests, if your system administrator has enabled this functionality.
Create Random Guest Accounts
You can create a set of multiple random guest accounts in advance, record the details separately, and store them in the system for future use. For example, if you are a lobby ambassador who needs to distribute guest accounts on a regular basis, you can save time by using these generic, randomly created accounts.
| Step 1 | Click
Random on the
Create
Accounts page.
Your system administrator configures which fields will display on this page and are required for creating guest accounts. Some fields are mandatory (marked with *) and display with default information that you can change. | ||
| Step 2 | Retain or update
the
Guest
Type you want to assign to the guest.
The various types of guests and their access privileges are defined by your system administrator. The maximum number of devices that guests can simultaneously connect to the network and the maximum duration time for network access are displayed for the guest type you select. | ||
| Step 3 | Enter the
Number
of Accounts to create.
The maximum number of random guest accounts displayed that you can create at a time is configured by your system administrator. | ||
| Step 4 | Based on how your system administrator configured this setting,
you can either enter, edit or use the predefined
Username
Prefix to add to each account name.
The remainder of the username is generated randomly adhering to the username policies set by your system administrator. | ||
| Step 5 | Retain or update
the defaults for the mandatory settings and enter information in the other
fields, as desired.
The system
administrator can configure multiple selections for
Language,
Location, and
SSID. However, if only one selection is specified,
it will not display, but is automatically assigned when you create the guest
accounts. You can view this selection in the guest account details after the
accounts are created.
| ||
| Step 6 | Click
Create to create the specified number of random
guest accounts.
If you
created:
|
What to Do Next
When you generate random guest accounts, you probably do not have guest information such as email addresses or phone numbers. You can print the account details and manually distribute the login credentials to the guests. If you created more than 50 accounts, open the specific notice on the Notices page to view account details for up to 50 accounts. To view all the accounts created, go to the Manage Accounts page.
Import Guest Accounts
If your company maintains account information for authorized visitors in an external database or file, you can create guest accounts for these users by importing their information into the Sponsor portal. The file containing the account information must be a .csv file, which the Sponsor portal then parses and creates new guest user accounts for each entry in the file.
-
You should have the necessary permissions to import guest account information.
-
You cannot import guest account information from a mobile device (running Apple iOS, Android, and so on), so ensure that you are importing account information using a desktop device (running Apple OSX, Windows, and so on).
| Step 1 | Click
Import on the
Create
Accounts page.
Your system administrator configures which fields will display on this page and are required for creating guest accounts. Some fields are mandatory (marked with *) and display with default information that you can change. | ||
| Step 2 | Retain or update
the
Guest
Type you want to assign to the guest.
The various types of guests and their access privileges are defined by your system administrator. The maximum number of devices that guests can simultaneously connect to the network and the maximum duration time for network access are displayed for the guest type you select. | ||
| Step 3 | Click Download Template to get a template to use for the import file. Ensure that the file you are importing conforms to the required structure before importing it. Additionally, if the file includes multi-byte characters, you must save the file in UTF-8 format. | ||
| Step 4 | Click Browse to locate and select the .csv file that contains the guest information needed to create the guest accounts. | ||
| Step 5 | Retain or update
the defaults for the mandatory settings and enter information in the other
fields, as desired.
The system
administrator can configure multiple selections for
Language,
Location, and
SSID. However, if only one selection is specified,
it will not display, but is automatically assigned when you create the guest
accounts. You can view this selection in the guest account details after the
accounts are created.
| ||
| Step 6 | Click Import to import the account information from the external database or file. A message informs you that the accounts are being created in the background and to check the Notices page for a status on the operation. |
What to Do Next
You can email or print the account details for guests, if these facilities are available to you. You can also text the account details to guests, if your system administrator has enabled this functionality.
On the Notices page, open the specific notice to view account details for up to 50 accounts. If you imported more than 50 accounts, go to the Manage Accounts page, to view all the accounts created.
Privacy of Guest Passwords
You can create guest accounts for authorized visitors requiring access to your company’s network and internal resources. When you create accounts, whether it is for a known guest, or randomly for a multiple set of guests, or when importing a batch of guest accounts from an external database, Cisco ISE generates passwords for these accounts.
However, if your guests are permitted to change their passwords and do so after they log into the Guest portals, you can no longer view these passwords, as they are considered private.
If guests lose or forget their passwords after they change them, you cannot simply resend their passwords to them. You have to reset their passwords to random passwords and notify them of the new passwords.
Create Account Settings
| Field | Usage Guidelines |
|---|---|
|
Guest Type |
Select the type of guests whose accounts you are creating. If only one guest type is configured by your system administrator, you can only use this type to create guest accounts. Cisco ISE includes these default guest types to map guests to their appropriate network access privileges:
Your system administrator might restrict this list or create additional guest types. The system administrator can set up guest types to Allow guest to bypass the Guest portal. In this case, the guest accounts created using this guest type are enabled automatically, and their states display as Active, even if the guests have not yet logged into a Cisco ISE web portal. If this option is not configured, the accounts are not enabled until the guests actually log into a web portal and their initial states display as Created. |
|
SMS Provider |
This field displays only if more than one SMS provider has been configured for selection by your system administrator. If only one provider is configured, it will not display as it is the only option available for this Sponsor portal. If you know your guest's cellular provider and it is listed under SMS Provider, select it to send a SMS notification with the login credentials to the guest. If the cellular provider is not listed, then select the default global provider listed. Include the country code of the guest's phone number if using the default global provider. The supported phone number formats include: +1 ### ### ####, ###-###-####, (###) ### ####, ##########, 1########## and so on. |
|
Group Tag |
Groups certain guests accounts for tracking and searching purposes. For instance, you can assign a tag to all the guests attending training at a certain location. You can then search for these guests to either extend their account duration if the training is not completed in time or delete their accounts after the training is finished. |
|
Location |
This field displays only if more than one location has been configured for selection by your system administrator. If only one location is configured, it will not display as it is the only option available for this Sponsor portal. Select the location to be used for the guest accounts. This determines the time zones that applies to the guests and helps define valid time ranges and other time parameters that apply to their accounts. The time left for a guest account is related to the specific location assigned to it, and not the sponsor's local time. |
|
SSID |
This field displays only if more than one SSID has been configured for selection by your system administrator. If only one SSID is configured, it will not display as it is the only option available for this Sponsor portal. Select the SSID of the network that guests will log into. This SSID is included in the account notifications sent to the guests. |
|
Language |
This field displays only if more than one language has been configured for selection by your system administrator. If only one language is configured, it will not display as it is the only option available for this Sponsor portal. Choose the language used when sending account notifications (email, text, and print) to the guests. |
|
Days; From date, To date; From time, To time |
Define the account duration in terms of the maximum number of days, the dates, and the hours when the guests can access the network. Make sure that the amount of time does not exceed the maximum defined by the system administrator. |
Manage Guest
Accounts
- Sponsor Portal Manage Accounts Page
- Edit Guest Accounts
- Resend Guest Passwords
- Extend Guest Account Durations
- Suspended and Expired Guest Accounts
- Suspend Guest Accounts
- Delete Guest Accounts
- Reset Guest Passwords
- Reinstate Guest Accounts
- Manage Accounts Page Details
- Manage Account States
Sponsor Portal Manage Accounts Page
You can use the Manage Accounts page to manage the guest accounts you created or have the authority to manage. You can perform the following actions:
Edit Guest Accounts
| Step 1 | On the Manage Accounts page, select the guest account that you want to edit. |
| Step 2 | Click Edit. |
| Step 3 | Edit any of the fields that display. For instance, you may want to change the defaults for Language and Location that you retained when you first created the guest accounts. You may want to add information such as names, email addresses, and phone numbers that was not available when you first created random guest accounts. If you change (reduce or extend) the time duration for an account, the time left is changed based on the specific location assigned to it, and not the sponsor's local time. |
| Step 4 | Click Save. |
| Step 5 | View the changes you made to their account information. |
Resend Guest Passwords
Guests may sometimes be unable to log into the network because they have lost or forgotten their passwords. You can help these guests regain access to the network by resending their original passwords.
-
You cannot resend passwords to guests who have changed them. If these guests have lost or forgotten their new passwords, you must reset them and notify the guests.
-
You can resend passwords for accounts that are either Created or Active.
-
You cannot resend passwords for accounts that are either Pending Approval, Suspended, Expired, or Denied.
| Step 1 | On the Manage Accounts page, select the guest accounts whose passwords you want to resend. |
| Step 2 | Click Resend to send the guests their account details again. You are asked to select how you want to notify the guests of their new account details, either by email, text, or print. |
| Step 3 | In the Resend pop-up window, select the various notification options (for both guests and sponsors) and click OK. |
Extend Guest Account Durations
You can extend the account durations for guests before or after their accounts expire, so that they can access the network for longer than originally permitted. You can also extend the account durations when editing guest accounts.
If guest accounts have expired, they are no longer able to connect to the network. An automated process runs periodically (based on criteria set by your system administrator) that removes (purges) all expired accounts from the system. If that happens before you can extend the account duration for an expired account, you will need to create new accounts for these guests.
| Step 1 | On the Manage Accounts page, select the guest account that you want to extend. |
| Step 2 | Click Extend. |
| Step 3 | Enter the extension information and click OK. The Expiration Date and Time Left are automatically updated with the new time duration. The time left is related to the specific location assigned to the guest account, and not the sponsor's local time. |
| Step 4 | Verify that the Expired accounts' duration times have been extended and their states are reset as follows: |
Suspended and Expired Guest Accounts
When guest accounts are suspended manually by you or expire, the affected guests are disconnected from the network and can no longer access it.
Regardless of their state, active, pending and so on, guest accounts expire when they reach the end of their account duration, which you defined when you created the accounts.
Suspended and expired accounts are automatically purged based on a schedule defined by your system administrator, but the default is every 15 days. After an account is purged, you must create a new account for that guest. However, you can reinstate suspended accounts and extend expired accounts before they are purged.
Suspend Guest Accounts
You can suspend the accounts of guests, which disconnects them from the network and prevents them from accessing it. However, their accounts are retained in the Cisco ISE database.
Reset Guest Passwords
Guests may sometimes be unable to log into the network because they have lost or forgotten their passwords. You can help these guests regain access to the network by resetting their passwords.
| Step 1 | On the Manage Accounts page, select the guest accounts whose passwords you want to reset. |
| Step 2 | Click Reset Password to generate random system passwords. You are asked to confirm the reset and select how you want to notify the guests of their new account details, either by email, text, or print. |
| Step 3 | In the Reset Password pop-up window, select the various notification options (for both guests and sponsors) and click OK. |
Reinstate Guest Accounts
Manage Accounts Page Details
| Action | Usage Guidelines | Eligible Account States |
|---|---|---|
|
Edit |
Make changes to a selected account. |
All, except Suspended, Denied. |
|
Resend |
Email, text, or print account details for the selected guests. |
Active, Created |
|
Extend |
Adjust the access time period or reactivate the selected expired guest accounts. |
Active, Created, Expired |
|
Suspend |
Disable the selected guest accounts without deleting them from the system. You may be prompted to provide reasons for suspending an account. |
Active, Created |
|
Delete |
Remove the selected guest accounts from the Cisco ISE database. |
All |
|
Reset Password |
Reset the selected guest passwords to random passwords and notify the guests of the account details. |
Active, Created |
|
Reinstate |
Enable the selected suspended guest accounts and approve previously denied accounts. |
Suspended, Denied |
|
Refresh |
View any changes to the displayed accounts. |
Not applicable |
Manage Account States
| Current State | Description | New State |
|---|---|---|
|
Active |
Guests with these accounts have successfully signed in through a credentialed Guest portal, or bypassed the credentialed Guest captive portal. In the latter case, the accounts belong to guest types that are configured to bypass the credentialed Guest captive portal. These guests can access the network by providing their login credentials to the native supplicant on their device. |
Account states change based on the action taken on them. |
|
Created |
The accounts have been created, but the guests have not yet logged into a credentialed Guest portal. In this case, the accounts are assigned to guest types that are not configured to bypass the credentialed Guest captive portal. Guests must first sign in through the credentialed Guest captive portal before they are able to access other parts of the network. |
Account states change based on the action taken on them. |
|
Denied Accounts that expired while in a denied state remain as Denied. |
The accounts are denied access to the network. |
If you reinstate denied accounts, their states change to: All denied accounts that are not reinstated are purged in the next purge cycle. Denied accounts that expired cannot be extended (reactivated); you must create new accounts. |
|
Expired |
The time period for the account has ended. |
If you extend unexpired accounts, their states remain unchanged. If you extend (reactivate) expired accounts, their states change to: |
|
Pending Approval |
The accounts are awaiting approval to access the network. |
If approved, based on the guest type configuration, the account can be Active or Created. If denied, it appears on the Manage Accounts page as Denied. |
|
Suspended Accounts that expired while suspended remain as Suspended. |
The accounts have been suspended by you or another sponsor, who has the privilege to do so. |
If you reinstate suspended accounts, their states change to: |
Pending Guest
Accounts
- Sponsor Portal Pending Accounts Page
- Approve Pending Accounts
- Deny Pending Accounts
- Pending Accounts Page Details
- Pending Accounts States
Sponsor Portal Pending Accounts Page
You can use the Pending Accounts page to process accounts for self-registering guests who are awaiting sponsor approval before they are allowed network access. You can:
Approve Pending Accounts
You can approve accounts listed as either Pending Approval or Denied to provide guests access to the network.
On a desktop device, you can select multiple check boxes or use the select all checkbox to select several guest accounts simultaneously. If using a mobile device, you can only select individual accounts and approve them one at a time.
| Step 1 | On the
Pending
Accounts page:
|
| Step 2 | Click OK to confirm that you want to approve the selected accounts. The approved accounts no longer display on the Pending Accounts page, but display on the Manage Accounts page. |
What to Do Next
On the Manage Accounts page, verify that the approved accounts are listed as either Created or Active. If accounts expired while awaiting approval, they are now listed as Expired on this page and will no longer display on the Pending Accounts page.
Deny Pending Accounts
You can deny approval for accounts listed as either Pending Approval or Approved and prevent guest access to the network.
On a desktop device, you can select multiple check boxes or use the select all checkbox to select several guest accounts simultaneously. If using a mobile device, you can only select individual accounts and deny them one at a time.
| Step 1 | On the
Pending
Accounts page:
|
| Step 2 | Click OK to confirm that you want to deny approval for the selected accounts. The denied accounts display on the Pending Accounts page as Denied until you leave the page. After that, they display as Denied on the Manage Accounts page. |
What to Do Next
On the Manage Accounts page, verify that the accounts that were denied approval are listed as Denied. If the denied accounts expired while awaiting approval, they are now listed as Expired.
Pending Accounts Page Details
| Action | Usage Guidelines | Eligible Account States |
|---|---|---|
|
Approve |
Approve one or multiple guest accounts for network access. |
Pending Approval, Denied |
|
Deny |
Deny approval to one or multiple guest accounts for network access. |
Pending Approval |
Pending Accounts States
| Current State | Description | New State |
|---|---|---|
|
Denied Accounts that expired while in a denied state remain as Denied. |
The accounts are denied access to the network. |
If you approve denied accounts, they no longer display on the Pending Accounts page. They display on the Manage Accounts page, where their states change:
All denied accounts that are not approved are also purged in the next purge cycle. |
|
Pending Approval Accounts that expired while awaiting approval remain as Pending Approval. |
The accounts are awaiting approval to access the network. |
If you approve pending approval accounts, they no longer display on the Pending Accounts page. They display on the Manage Accounts page, where their states change:
If you deny approval for pending approval accounts, their states change to Denied on thePending Accounts page, until you leave the page. After that, they display as Denied on the Manage Accounts page. All denied accounts are purged in the next purge cycle. |
Notices and
Notifications
- Notices When Creating Random and Imported Guest Accounts
- Provide Account Details to Known Guests
- View and Provide Random Guest Account Details
- View and Provide Imported Guest Account Details
Notices When Creating Random and Imported Guest Accounts
The Sponsor portal does not immediately display account details when you create:
-
More than 50 random guest accounts simultaneously.
-
One or more guest accounts by importing their information.
Instead, Cisco ISE allows you to continue other operations on the Sponsor portal, while it creates these guest accounts in the background. You should periodically check the Notices page for a notice that contains the account details.
On the Notices page, select the notice and view a summary of the newly-created accounts, which are also listed on the Manage Accounts page. You can chose various methods, such as email, SMS (text), and print, to provide the account details and login credentials to the guests and yourself.
Provide Account Details to Known Guests
You can email, text, or print guests their account details, depending on how your system administrator has configured the Sponsor portal. Your system administrator can also set up email and text notifications so that you send guests their usernames separately from their passwords.
-
You should have created accounts for guests whose personal information is available.
-
To provide email or printed notifications to guests, you should have these facilities available to you.
-
To send text notifications to guests, your system administrator should enable the SMS feature for the sponsor group to which you belong.
-
For guests to receive email or text notifications, their accounts must have email addresses or phone numbers associated with them.
| Step 1 | On the Account Information dialog box that lists the account created for the known guest, you can: |
| Step 2 | On the
Notify dialog box, depending on the notification
options configured by your system administrator, you can:
|
| Step 3 | Click Ok to send the notifications or Cancel if you do not want to send the notifications. |
View and Provide Random Guest Account Details
You cannot email or text randomly created guest accounts; you can provide these guests a printed version of their account information. However, once these accounts are created, you can edit the accounts and add email addresses and phone numbers. You can then use this information to send future email and text notifications to these guests.
-
You should have created more than 50 random guest accounts simultaneously.
-
To provide email or printed notifications to guests, you should have these facilities available to you.
-
To send text notifications to guests, your system administrator should enable the SMS feature for the sponsor group to which you belong.
-
For guests to receive email or text notifications, their accounts must have email addresses or phone numbers associated with them.
| Step 1 | On the Notices page, open the notice to view a summary of the account details of the newly-created random guest accounts. An Account Information dialog box displays up to 50 of the accounts that were created and the usernames and passwords associated with these accounts. If you created more than 50 random accounts, go to the Manage Accounts page to view all the accounts created. | ||
| Step 2 | On the
Account
Information dialog box, you can:
|
What to Do Next
On the Notices page, open the print notice to view if the selected accounts were printed successfully. Each account is printed separately, so you can provide login credentials to individual guests.
View and Provide Imported Guest Account Details
You can email, text, or print guests their account details, depending on how your system administrator has configured the Sponsor portal. Your system administrator can also set up email and text notifications so that you send guests their usernames separately from their passwords.
- You should have imported guest information from a .csv file to create one or more guest accounts.
- To provide email or printed notifications to guests, you should have these facilities available to you.
- To send text notifications to guests, your system administrator should enable the SMS feature for the sponsor group to which you belong.
- For guests to receive email or text notifications, their accounts must have email addresses or phone numbers associated with them.
| Step 1 | On the Notices page, open the notice to view a summary of the account details of the newly-created imported guest accounts. An Account Information dialog box displays up to 50 of the accounts that were created, the usernames and passwords associated with the accounts, and other guest information that was available when importing. If you imported more than 50 accounts, go to the Manage Accounts page to view all the accounts created. | ||
| Step 2 | On the
Account
Information dialog box, you can:
| ||
| Step 3 | On the
Notify dialog box that lists the accounts created for
the imported guests, you can:
| ||
| Step 4 | Click Notify to send the notifications or click Done if you do not want to send the notifications. |
THE SPECIFICATIONS AND INFORMATION REGARDING THE PRODUCTS IN THIS MANUAL ARE SUBJECT TO CHANGE WITHOUT NOTICE. ALL STATEMENTS, INFORMATION, AND RECOMMENDATIONS IN THIS MANUAL ARE BELIEVED TO BE ACCURATE BUT ARE PRESENTED WITHOUT WARRANTY OF ANY KIND, EXPRESS OR IMPLIED. USERS MUST TAKE FULL RESPONSIBILITY FOR THEIR APPLICATION OF ANY PRODUCTS.
THE SOFTWARE LICENSE AND LIMITED WARRANTY FOR THE ACCOMPANYING PRODUCT ARE SET FORTH IN THE INFORMATION PACKET THAT SHIPPED WITH THE PRODUCT AND ARE INCORPORATED HEREIN BY THIS REFERENCE. IF YOU ARE UNABLE TO LOCATE THE SOFTWARE LICENSE OR LIMITED WARRANTY, CONTACT YOUR CISCO REPRESENTATIVE FOR A COPY.
The Cisco implementation of TCP header compression is an adaptation of a program developed by the University of California, Berkeley (UCB) as part of UCB's public domain version of the UNIX operating system. All rights reserved. Copyright © 1981, Regents of the University of California.
NOTWITHSTANDING ANY OTHER WARRANTY HEREIN, ALL DOCUMENT FILES AND SOFTWARE OF THESE SUPPLIERS ARE PROVIDED “AS IS" WITH ALL FAULTS. CISCO AND THE ABOVE-NAMED SUPPLIERS DISCLAIM ALL WARRANTIES, EXPRESSED OR IMPLIED, INCLUDING, WITHOUT LIMITATION, THOSE OF MERCHANTABILITY, FITNESS FOR A PARTICULAR PURPOSE AND NONINFRINGEMENT OR ARISING FROM A COURSE OF DEALING, USAGE, OR TRADE PRACTICE.
IN NO EVENT SHALL CISCO OR ITS SUPPLIERS BE LIABLE FOR ANY INDIRECT, SPECIAL, CONSEQUENTIAL, OR INCIDENTAL DAMAGES, INCLUDING, WITHOUT LIMITATION, LOST PROFITS OR LOSS OR DAMAGE TO DATA ARISING OUT OF THE USE OR INABILITY TO USE THIS MANUAL, EVEN IF CISCO OR ITS SUPPLIERS HAVE BEEN ADVISED OF THE POSSIBILITY OF SUCH DAMAGES.
Any Internet Protocol (IP) addresses and phone numbers used in this document are not intended to be actual addresses and phone numbers. Any examples, command display output, network topology diagrams, and other figures included in the document are shown for illustrative purposes only. Any use of actual IP addresses or phone numbers in illustrative content is unintentional and coincidental.
Cisco and the Cisco logo are trademarks or registered trademarks of Cisco and/or its affiliates in the U.S. and other countries. To view a list of Cisco trademarks, go to this URL: http://www.cisco.com/go/trademarks. Third-party trademarks mentioned are the property of their respective owners. The use of the word partner does not imply a partnership relationship between Cisco and any other company. (1110R)
Copyright © 2013-2014, Cisco Systems, Inc. All rights reserved.